Hi everyone. I wanted to do something springy and cute for my birthday (which was Tuesday), so I decided to play around with some stamping, and made some decals to put on my nails using a bunch of Bundle Monster plates that I have. Take a look at these precious fawns! Eeeep!
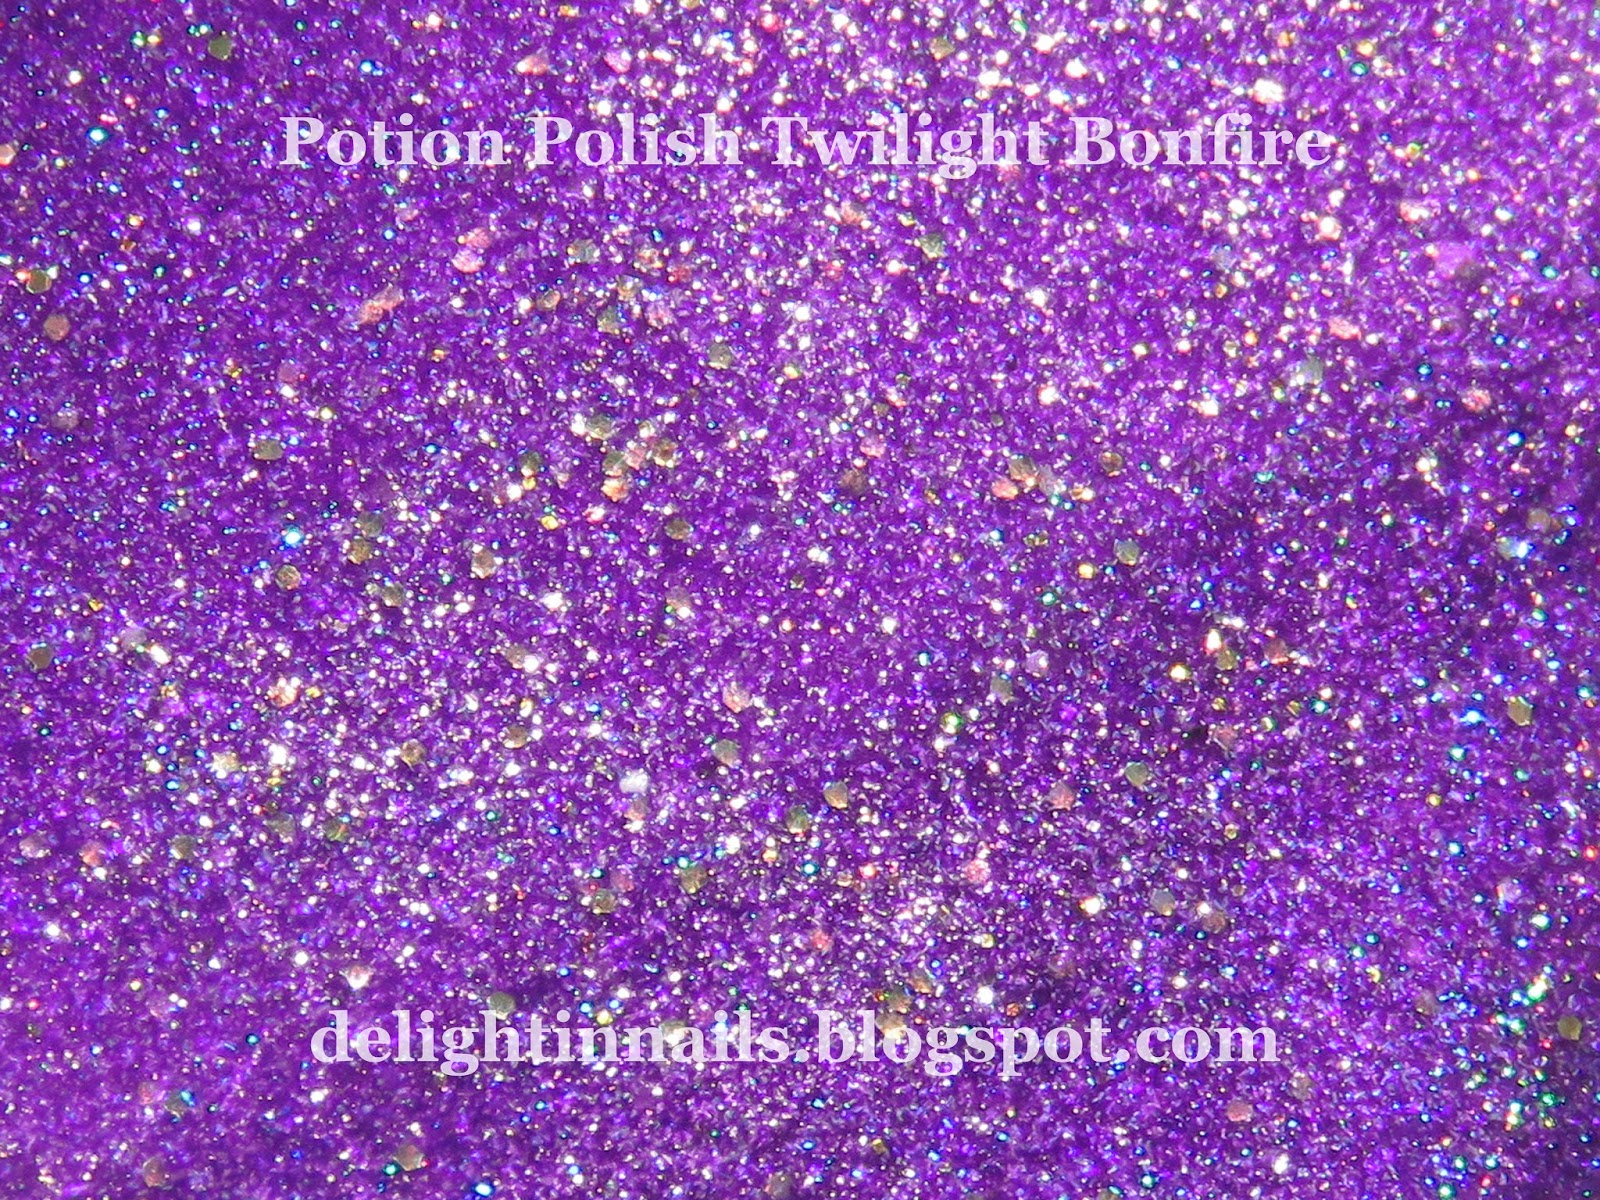
I created these by stamping multiple layers and creating decals from one of the stamps. It was a multi-step process, haha! First, I painted my nails using Potion Polish Twilight Bonfire because it was my birthday and I wanted purple holo on my nails. :D Then, I stamped on the leaves in the background using Mundo de Unas Green and BM-703. After that, I stamped on another layer using Mundo de Unas Avocado and BM-706 and let that dry. While that was drying, I created decals using BM-702's little deer image with Mundo de Unas Caramel, and painted the back of the deer white. This was so that the brown color would be brighter, and so that the little white spots would show through. Once my decals were dried enough, I cut them to size and put them over the whole design. After that, it was just a layer of topcoat and I was done. Love my little Bambis!!!
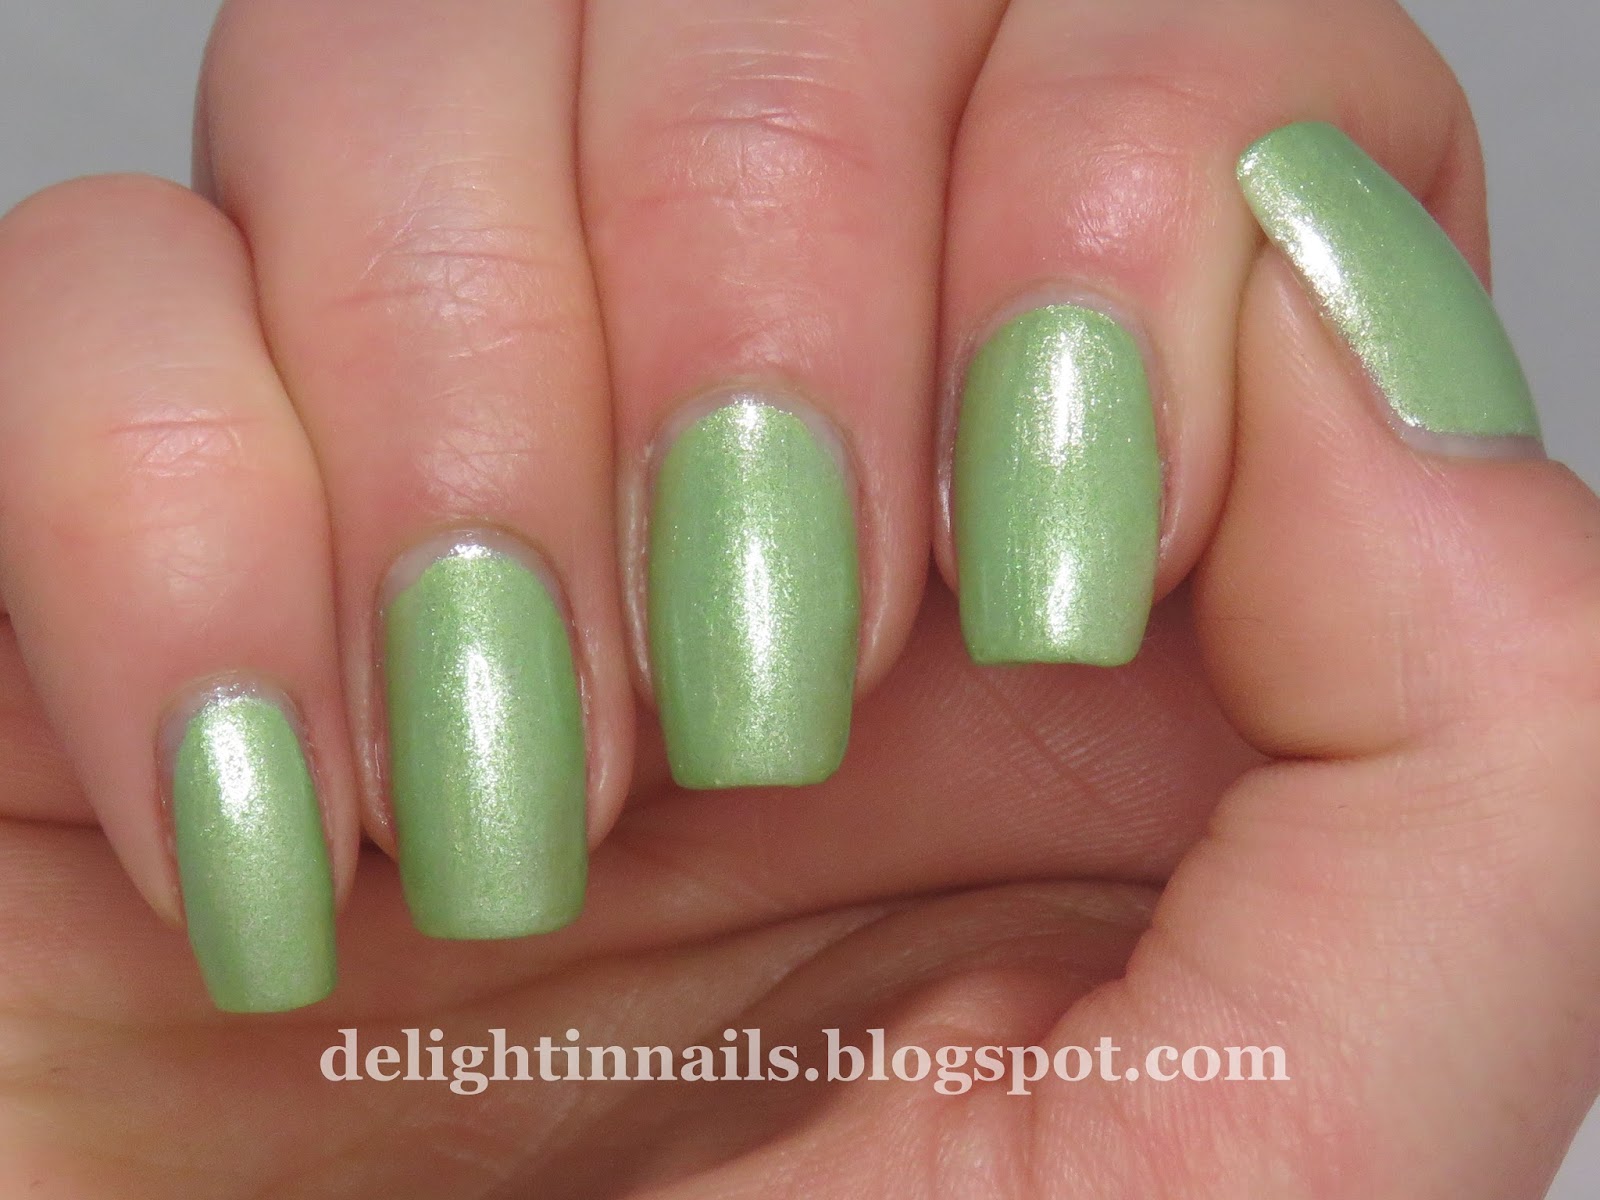
Now, here is what Twilight Bonfire looks like on it's own. Such a gorgeous purple! And so much holo goodness I couldn't stop looking at these in the sun! The polish formula was great too. This is two smooth coats. No dragging or pulling, just perfection. :)
Thank you so much for stopping to read my blog today. I'm still struggling a bit to get back into blogging after my 3 weeks off, but after today, I know I do like it. I like painting my nails and creating a little more than I like the blogging part, but it turns out I still like the blogging, too. :P Have a great day everyone!
Showing posts with label Brown. Show all posts
Sunday, April 24, 2016
Wednesday, November 25, 2015
Thanksgiving/Fall Nailart
Hi everyone! I have some Turkey Day nailart for you today. It is really just a fall manicure, but it feels festive to me! Since I have lots to do, this is going to be a short post - mostly pics!
I used Butter London Chuffed for my base, then stamped over top using Mundo de Unas Yellow and Reddish. The stamp I used for the leaves pattern is Bundle Monster's BM-H11. The acorn was a fail, but there is no time for a redo. I made the mistake of not testing it out first, and the brown polish I tried to use was no good...so I just stamped over top with a different brown thinking I could line it up, but I was sorely mistaken! Haha! The acorn image is from BM-H12.
Here is what Chuffed looks like on it's own. So much lovely gold shimmer peaking through this orange jelly! This is three thin coats.
Thank you so much for looking. Have a happy Thanksgiving, and I will be back this weekend!
Labels:
Brown,
Bundle Monster,
Butter London,
Mundo de Unas,
Nail Art,
Orange,
Red,
Revlon,
Stamping,
Yellow
Tuesday, September 29, 2015
Fall Leaves Mani + Tutorial Featuring Barielle Hot Chic Collection
Good morning! It's another Tuesday and I'm telling you, I am already ready for Friday! Today, I have a fall-inspired mani using a few of the Barielle polishes I showed off two weeks ago. This mani uses Barielle Secret Desire for the base. The leaves are hand painted with Barielle Orange U Jealous, and the outline/detail is done with Barielle Harley D.
Now, on to the tutorial!
Step 1: Paint your nails a solid color. In this case, I used Barielle Secret Desire.
Step 2: Draw a pointed oval shape (like a football) using the color you choose for your leaves - I used Barielle Orange U Jealous? here.
Step 3: Paint additional leaf shapes on the nail using the same color. I start with a line, then add the edge shapes to ensure it comes out relatively symmetrical.
Step 4: Carefully outline your leaves using a fine detail brush and your darker color. I used Barielle Harley D here. This is your opportunity to fix any mistakes made in steps 2-3. :)
Step 5: Draw a fine line down the center of each leaf using your detail brush in the same dark color.
Step 6: Add the "veins" for the leaves using the detail brush. I use a very light touch for this to make them lighter than the center vein. It's ok to go so light that you have uneven strokes. It actual makes it look more natural.
Step 7: Add your topcoat and admire your handiwork. ;)
Hooray! I'm starting to enjoy these tutorials! Hopefully I will get better at it over time. I struggle with the whole having to stop and take pictures of every step thing. It's hard to stop and start once the creative juices get flowing! lol
Thank you so much for looking. If you guys are appreciating these tutorials, please let me know. And let me know if there is a particular mani I have done in the past, or any other style you would like me to do a tutorial for! I need the practice, so I will be happy to oblige. :) Have a great week! I'll have another mani for you Friday!
Sunday, September 13, 2015
Barielle Hot Chic Fall/Winter 2015 Collection
*press sample
Good morning! Today, I have swatches from Barielle's Fall/Winter 2015 collection: Hot Chic. These colors are all great for fall, and I'm really pleased with the formulas, too.First, I have Sheer Nonsense. This one got a bit washed out in the photos, but it is a very pale nude. Much closer to cream colored than tan. It went on in two smooth coats and dried to a glossy finish. I added a coat of Out The Door Topcoat for these photos.
Next, is Secret Desire. This color is very accurate. It is a metallic-shimmery purple. This is two coats, with one coat of Out The Door topcoat. The formula was great on this polish as well. This one will be great in some Halloween manis, too. Yay purple!
Orange U Jealous is an orange leaning red cream filled with gold shimmer. This formula was great as well, and shown here is two coats, plus a coat of Out The Door topcoat. This one will be making an appearance for Halloween and Thanksgiving manis for sure.
Next, is Harley D. This is a dark chocolatey brown with bronze shimmer. I love this dark brown color for fall and winter. I did two coats here plus one coat of Out The Door topcoat. This one's formula was the same as the others.
Last, but not least is Born-2-B Naughty. This is a dark teal cream. It went on in two smooth coats and is pictured with one coat of Out The Door topcoat. This one is not a very original color, but I always love a good teal cream, so I am not complaining. ;)
Get ready to see the guys make an appearance in some fall/winter nail art in the next few weeks and months! :P Thank you so much for stopping to read my blog today. If you loved these colors, you can find them at Barielle.com, where they retail for $8 a piece. Have a happy Sunday!
Sunday, June 21, 2015
Rainbow Honey June Mystery Bag
Hi friends! Today, I have a review of the mystery bag I got from Rainbow Honey for the month of June. It is another great collection of polishes and other goodies. I love the colors that came in this bag, and I also got a little vial of perfume, scented topcoat, and soap.
I have not used the soap or the perfume yet, but they both smell heavenly. I'm pretty sure my husband will be stealing the soap. ;) I swatched the three polishes pretty quickly this time, and I adored all of them this time around (no surprise there)!
First, I have Rainbow Honey Thallo Bot. It is a pale green metallic polish that went on nicely in two coats. I like how this one was not too streaky, as I have that issue with a lot of metallic polishes when I use them.
Next, I have Rainbow Honey Cuprum Veritas. This is actually a bunch of tiny copper colored glitters packed into a clear base. It took three thin coats to build this one up. It could be worn as a topper if you opt to use just one coat over another color.
Last, is Rainbow Honey Aqua Cristalina. This is a glitter topper with tiny and medium sized hex glitters and multiple sizes and shapes of holographic glitter in a clear base. I love the sparkle of this one! I wore two coats over Essie Where's My Chauffeur?.
Thank you so much for looking. I appreciate all of you! :) I'll be back in a few days for this week's 52 Week Pick n Mix mani.
Saturday, April 25, 2015
Blobbicure + Stamping with MoYou Pro XL 05
Happy Saturday everyone! I have another mani for you today using this MoYou Pro plate for the Stamping Plate Challenge. I used some more of my new polishes from the Wet n Wild Silver Lake collection, too. This is Wear Skinny Jeans and A Latte Love in a fabulous beachy manicure! ;)
I decided to use the shell image from the plate this week, and knew instantly what colors to use. The light blue and sand make me wish I was in a beach house right now and not experiencing yet another bout of cold weather and snow. It can't be too much longer, right???!!
Here is what Wet n Wild Wear Skinny Jeans looks like by itself. It's a lovely soft blue, with a silvery shimmer that my camera refused to photograph for some reason. It's a very slight shimmer, but you can see it in real life. :)
Thank you so much for stopping by today to look at my mani. I hope you all have an awesome weekend!
Sunday, April 5, 2015
52 Week Pick n Mix Challenge - Music + Not Worn Enough
Good morning. Well, I had wanted to post this manicure last night, but unfortunately, I fell asleep. So, you are getting it a day late, but I am rested, so that is good. With this mani, I wasn't sure what I wanted to do at first. I was trying to think of a band's cover art to do, or something like that, but every time I started thinking about it, I wouldn't be able to come up with anything. Music makes me think of my sister, so I kept circling back to her. The girl literally lives for music. She loves it. It is her passion. So, I decided to go another direction and just let her inspire my musical nails. Now, when I think of my sister, I think of natural beauty. She gravitates toward neutral and earthy colors, and seriously is just effortlessly beautiful. So, I was digging through my messy drawer of untrieds and came across China Glaze Lug Your Designer Baggage. It is an neutral brown base with gold flakies, and instantly made me think of my sister (color-wise I mean, the name is basically the exact opposite of my sister haha). I came up with the rest pretty quickly.
So after painting my nails with CGLYDB, I found a few stamping plates from the sets I received at Christmas, and added some musical stamps using PUEEN47 and Bundle Monster plate BM-411 with Wet n Wild Wet Cement.
Here is CGLYDB by itself. It's a brown crelly with loads of little gold flakies that builds up to opacity quickly in just two coats. This is a color that I bought just because it looks interesting and different, and I really don't wear brown much unless it fits my nail art, so I figured this color would fit well with the "not worn enough" prompt.
Thank you so much for stopping by on this lovely Easter Sunday. Have a great day everyone!
Thursday, November 20, 2014
52 Week Pick n Mix Challenge - Books + Brown
Ah books. I love books so much. I had a hard time just picking one book to inspire me, so I had to think about this one a while. I was sitting in my living room just staring at our bookshelf trying to find the one book that would wind up gracing my nails for this challenge. In the end, I couldn't pick one, so I came up with this manicure instead.
Staring at my bookshelf gave me the idea to the book bindings of several books. I have collected all of my favorite classics in leather with pretty gold embossed covers, and they all look so pretty sitting next to each other. I thought it would look good on my nails, so I went for it. I'm not sure that I like it in practice, but ah well. This is O.P.I. A-Piers To Be Tan as the base. I used the plastic wrap technique to blot on a darker brown polish from China Glaze called Call of the Wild, then added my detail and titles using Julep Mahima.
Here is what O.P.I. A-Piers To Be Tan looks like by itself. This is two smooth coats with a coat of Seche Vite.
Thank you so much for looking. Have a great day everyone!
Wednesday, October 22, 2014
52 Week Pick n Mix Challenge - 70's
Hello! For this week's challenge, I used some scrapbook paper that I had lying around as my inspiration. It is just brown paper with dots, so I thought it would be an easy manicure. It turned out that it was easy, but it was a bit time consuming because I had to keep waiting for the polish to dry as I added layers of dots. I didn't wait long enough for most of them, because I'm a busy gal, but you really can't tell too much. :P
I started off this manicure with a brown polish from Revlon's Moon Candy Universe nail polish set. After that, I added my dotting using Wet n Wild Wet Cement, Sally Hansen Mellow Yellow, Barielle Joytini, Julep Francis, and Pure Ice SuperStar! with various sizes of dotting tools.
Thank you so much for looking. Make sure you look at what everyone else came up with for this week's manicures.
Thursday, September 25, 2014
Golden Oldie Thursday - Brown
Good morning! I always have a hard time with brown, but after giving it a go with some stamping, I am actually really pleased with these nails. I used China Glaze Call of the Wild for my base. It's a nice, rich, chocolatey-brown cream. I decided to add some stamping using MoYou London's Suki 06 plate and Loreal's Because You're Worth It, which is a lovely gold.
Here is what China Glaze Call of the Wild looks like on it's own. Like all the China Glaze polishes I own, it painted on smoothly, with no issues. This is two coats.
Thank you so much for looking. This is the end of the Golden Oldie Thursdays, but we are starting up something new and fabulous next week. Stay tuned! And make sure you check out what the other girls did, too!
Subscribe to:
Posts (Atom)